


Netatmo dévoile la nouvelle Station Météo ORIGINAL
Remplacez facilement vos vannes thermostatiques actuelles sur vos radiateurs, même lorsqu'ils sont en fonctionnement. Aucune expertise technique n'est requise. Important : l'eau ne peut pas s'écouler du radiateur pendant l'installation
Vérifier ma compatibilité

Vous remplacez des vannes thermostatiques

Vous remplacez des vannes manuelles

Le chauffage collectif correspond à une chaudière qui produit de la chaleur pour plusieurs appartements dans un même immeuble.
Vérifier la compatibilité de mon chauffageUn système de radiateur à eau chaude compatible
un réseau Wi-Fi personnel
une de ces sources d'énergie : Gaz, Fioul, Bois, Pompe à chaleur
Le chauffage de ville correspond à une production de chaleur centralisée pour les appartements de plusieurs immeubles, voire de tout un quartier.
Vérifier la compatibilité de mon chauffageun réseau Wi-Fi personnel
une de ces sources d'énergie : Gaz, Fioul, Bois, Pompe à chaleur
Un système de radiateur à eau chaude compatible

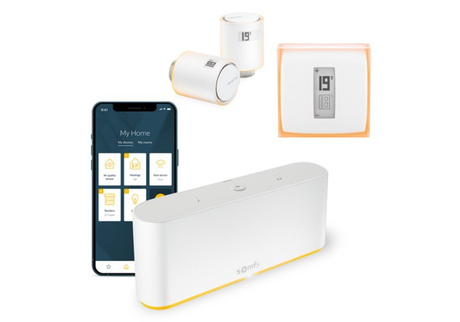
Dans cette installation, le relais Netatmo est branché à votre chaudière et contrôle votre chauffage.Il communique en radio avec le Thermostat Netatmo sur lequel vous réglez la température.Le relais assure la connexion Wi-Fi à internet et le contrôle à distance depuis l'application Netatmo.Ainsi, vous bénéficiez du contrôle à distance depuis l'application Netatmo.
Quel adaptateur utiliser pour installer une Tête Thermostatique Intelligente sur mon radiateur ?
Je n’arrive pas à installer physiquement la Tête Thermostatique Intelligente, que dois-je faire ?
Ma Tête Thermostatique Intelligente ne réagit pas à l’insertion des piles, que faire ?
Les Têtes Thermostatiques Intelligentes continuent-elles à fonctionner si le Wi-Fi est interrompu ?
Qu’est-ce qu’un radiateur à écoulement libre ? Dois-je installer une Tête Thermostatique Intelligente sur ce radiateur ?
Qui peut contrôler les Têtes Thermostatiques Intelligentes ?